

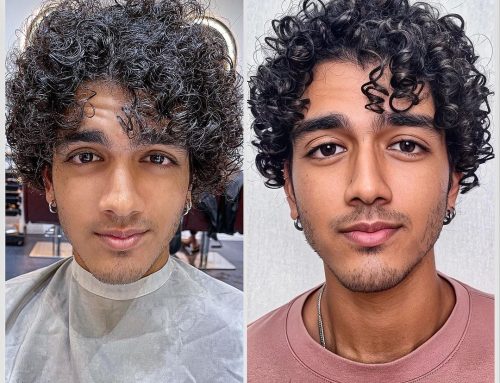
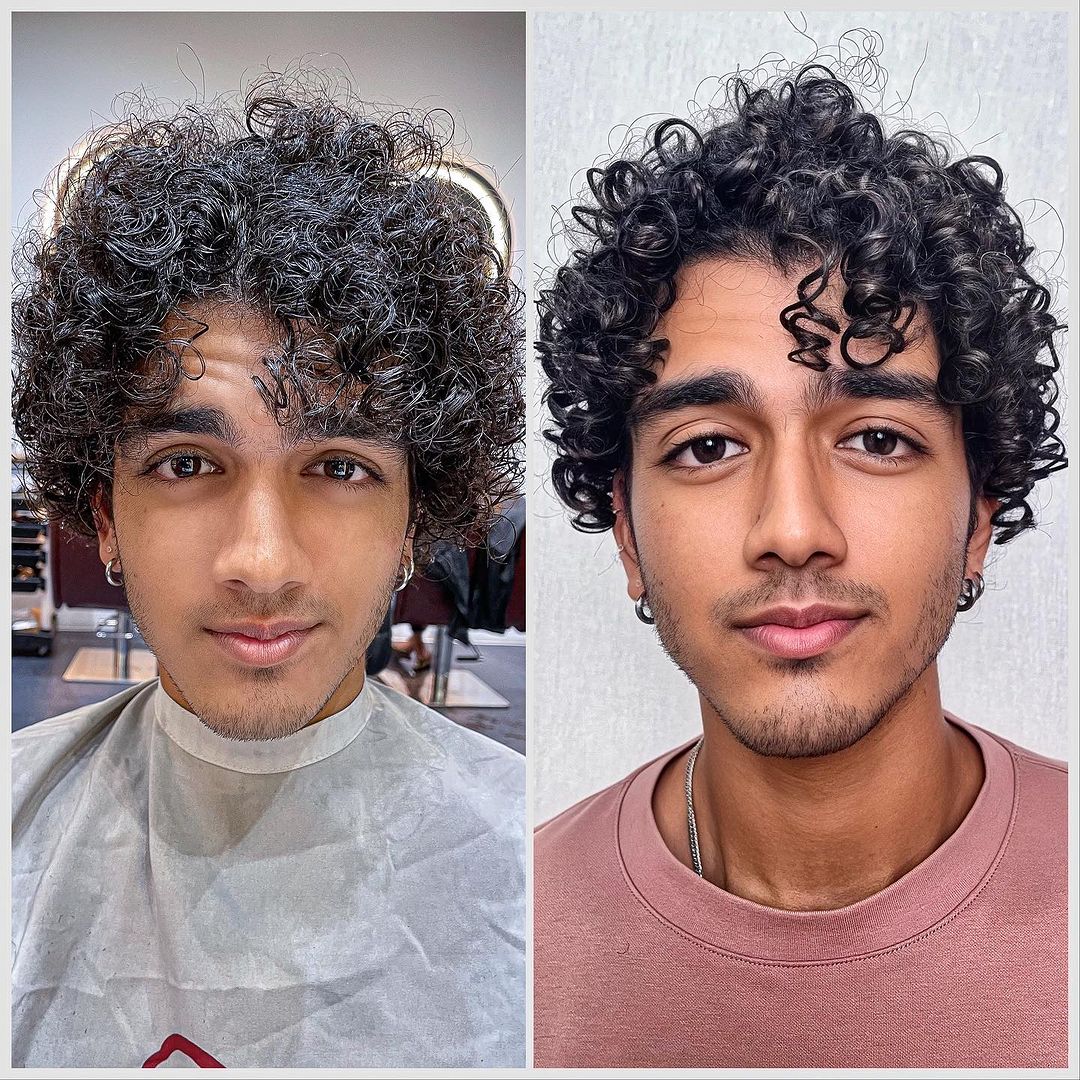
Roots are not a bad thing. The truth is there are certain situation when we are recreating regrowth to enhance the hair dimension by introducing shadow root to blonde balayage, warm reds, babylights, light browns and more. However, for ladies who wish for lighter hair from root to tip, it’s crucial for you to know how to touch up your roots on blonde hair in the most natural-looking, seamless way.
If you are colouring a bit of gray hair or your hair have turned to a different shade of brown from brunette, those root powders or root cover-up sprays will definitely be of great help. For small patches of gray which peek through the hairline, you may use root powder which is easier for controlling little areas than a spray. For a more extensive area, you may have to consider using a root spray instead. Choose a shade which best suits the colour of your hair and use it sparingly. It is wiser to layer on a bit more if you required it.
However, if you are trying to cover a large area of gray or going from brown to red or light to dark, the root touch-up sprays will not be suitable for you. You have to try an at home permanent box dye.
The most important rule for your own root touch up is only apply colour where it is only required that is on the roots. There are people who have misunderstood and think that they have to be pulling the colour through the whole hair length in order for it to blend perfectly. However, if you are applying colour on places where there is already colour, the hair will appear less natural and opaque.
It is important to follow the colour that will match well to your present hair colour and the key of at-home box colour is the tone which pin point to whether is your present colour cool, neutral or warm?
Here are a few extra tips for you:
Do more experimenting. If you are doing it for the first time or otherwise still worried, try to practice the entire procedure on a little section of your hair hidden behind your head.
Please remember to wear a button-down shirt while doing the application as you do not wish to have to remove a shirt over your head during rinsing time.
Priming your hairline with Vaseline application to avoid any stains.
The following are more professional guideline and details for proper root touchup.
Should you colour the roots first or last?
What a wonderful question!
The response is, “It depends!”
on what? You may ask. In this blog post, we shall explain.
Keep reading!
COLOUR ROOTS FIRST OR LAST?
When you have a dark regrowth
This is the scenario that you are most likely to encounter if you have decided to perform a root touchup yourself at home.
When there is a dark regrowth, the root region must first to be dealt with. It is entirely up to you and will depend on the specific circumstances you confront and the level of lift necessary, whether you use bleach, high lift colour, or regular colour. However, you must first address the root first.
When the regrowth is lighter than the hair ends.
This is not as common. But when it does, you must colour the ends before returning to the root section at the last.
When the entire head is one colour and you are going lighter, it is a better idea to leave the root area for last.
The root portion always processes more quickly because it receives more heat from the scalp, which should explain this.
Therefore, for long hair, when applying colour takes a lot of time, it is better to colour the root area last.
Once the root region has lifted to the desired colour, you may rinse your hair.
When you are going for darker colour and your whole head is one colour
Colour the hair roots and hair ends all together if you are going for darker colour.
Case no 1: A Dark Regrowth, Light Ends
Perhaps the most typical circumstance is this one. It could manifest in several ways.
Your hair could appear like this:

Level 6 dark regrowth. Brassy mid-ends at level 7-8. The hair ends are level 10 blonde.
In this case, you will need to colour the roots first as described in the scenario above.
Lift the roots first with a high lift colour or professional bleach.
Next, rinse.
Follow by colouring the entire head.
That would be the best method to get a consistent desired outcome.
Light Ends with Dark Roots
Case no 2: A Dark Regrowth, Light Ends
This situation is less common. But it is still possible to happen.
It sometimes occurred in “hot root” situations, where the colour at the root area has processed more quickly than anticipated.
This might also occur when the colour has been left on the root area for too long, and the texture of the hair is fine.

Ends Brassier Than the Roots
Dark Ends, Light Root
When the bleach is kept in the root region for too long during the bleaching process, you may sometimes get this outcome.

The root region is lighter than the rest of the hair.
In these situations, colouring the ends first and the root region to the last is a smart idea.
Finally, go back to the root region last.
Process and keep a close eye on the root region.
Once finished, rinse your whole head.
Do you need to lift and dye your dark roots blonde?
This process is not difficult and complicated.
Bleaching the root region usually works quickly.
Since it is closest to the scalp where all the heat comes from.
It is virgin hair, too.
So long as you employ the proper products and techniques, lifting should be simple and quick.
We will explain how in the following.
What colour are your roots of hair?
Needing to Bleach Dark Roots

The image above shows a typical case of very dark roots that need bleaching and lifted up to the same level as the lengths.
Before toning the roots, lifting up the colour is required by applying bleach exclusively to the dark root area.
What do you need to lift and bleach dark roots?
Use a developer of 20 Vol. If the hair has to be lifted it is the dark blonde and the texture is relatively fine.
However, use a more concentrated 30 Vol. developer if the hair is black (as in the image above).

How do you blend the developer and bleach together?
Mix the developer and bleach together, preferably with a whisk, in a plastic bowl.
How do you apply, and up to where?
Perform the bleach application directly at the roots area.

What is the technique to apply bleach properly to the root region with the formation of bands?
Perform the root application with the mixture and apply the mixture to as far as the lighter area of hair.
It is crucial to avoid applying the mixture again to previously bleached hair since doing so might result in hair breakage and damage.
Do not worry if you accidentally overlapped during the application.
It will still be OK if you just wipe it immediately with a damp cloth.
The bleach will not sit or process on the overlapping hair in this approach.
How can you protect your roots from any damage when you bleach them?
The most crucial action you can undertake is to use high-quality bleach.
Every bleach has a different level of lifting strength.
In other words, they may stay on the scalp and hair for longer than expected.
When can you start rinsing?
If your ends are blonde, you must continue bleaching the root region until it is similarly white.
Rinsing too soon is a common mistake that you may make.
You must wait until the colour of the roots becomes almost white and very pale yellow.
Next, rinse.
You will get the ideal blonde outcomes in this manner.
Devoid of any banding.
After you have bleached your hair, how do you tone it?
After the hair has been well lifted, rinse it off and give it a close inspection.
Is there any band observed? Or, are there any areas where the hair is more yellow?
If so, you should start by applying the toner to this area.
Which toner should you use for your just-bleached hair?
There are several toners for you to consider, both demi-permanent and permanent.
To choose a toner, look at the bleach root region and compare the colour using the chart below.
Leave A Comment