

1. Set your goals and budget in line
Highlights are stunning, but at a price that ranges from $120 to $450 for a complete full head highlights, they’re among the most expensive hair salon services. Moreover, if you add on trimming the hair, a base colour root touching up and hair treatment, the cost could easily exceed your budget. One reason that glittery hair has become more expensive is the trend in salons to create a personalized look instead of the standard “frosting”. The cost is also dependent on whether you opt for allover lights, partial highlights and a mix of lowlights and highlights, balayage or foils, and also the experience and skill of your colourist and the location of your salon. It is possible to reduce the maintenance and cost by opting for highlights that are low-contrast within the two shades of your initial base colour; choosing the simplest quantity of highlights which is just around the face, or requesting a balayage technique rather than foils (see Tip 2 for more details). The more intense the contrast and the more highlights, the more maintenance and the cost.
2. Choose between balayage or foils
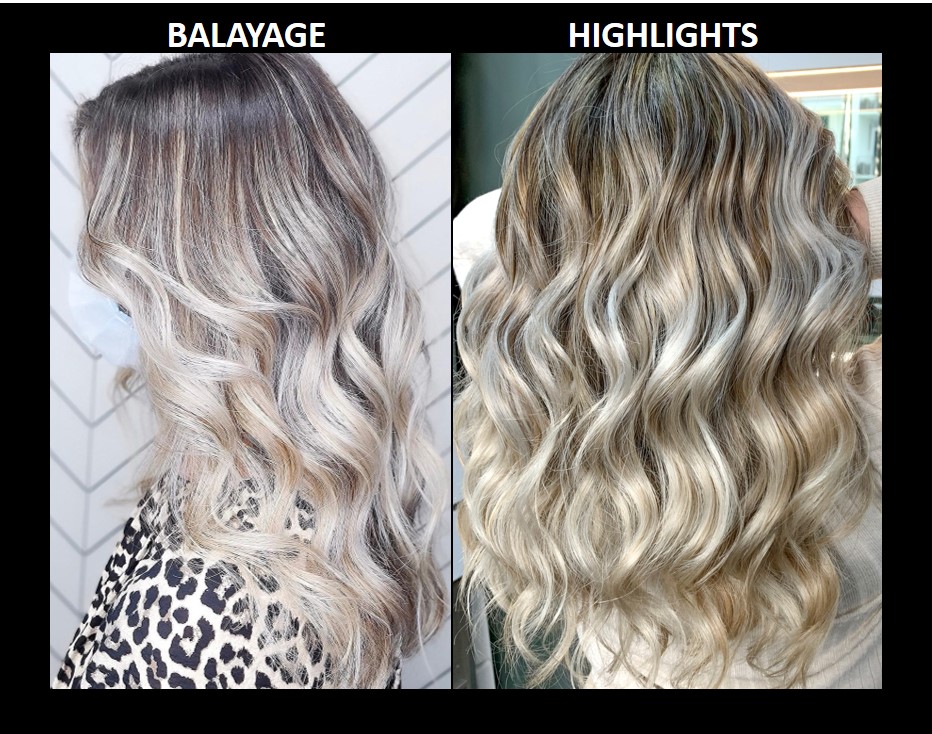
Please bear in mind that not all the colourists have both the skills, so you need to know the advantages of both. Foil highlighting will give the colourist more colour lift and control for an intense and enhanced highlights effect, whereas balayage gives a more natural and soft “summer at the beach” effect — and that’s more blended and subtle. Foils highlights are more classic and provide well symmetrical and balanced highlights that are uniform from the roots to the ends. Strands are selectively weaved out then slathered with lightener, and individually folded with foil to “bake”. Foils are the best choice when you have dark hair and your colourist is taking it more then three, four or five shades lighter, or when you’re looking for a higher contrast and brighter highlights. Also, you’ll get obvious lines of regrowth, and so you should plan on a touch-up once every 6-8 weeks for hair colour maintenance. Balayage is a technique where highlights are applied with a brush directly on the hair, hand painted in different widths, and the colour is in an ombre gradient progression that changes from dark to light. With the seamless blending hair growth out, it isn’t necessary to redo the hair for up to four months. Balayage is best for lobs, shoulder-length hair or longer and tousled layers. Be aware that certain salons , as well as some social media websites are promoting a combination known as “foilayage,” using handpainted highlights as well as covered in foil. Our take is you just need to do either.
3. Try to create an effect that is multi-tone
A lot of ladies dye their hair just one shade and do not get highlights. Some people have too many highlights and their hair turns into a one solid colour look. This can be a striking signature appearance if it is a good fit for you. You do however achieve the appearance of fuller hair, modern with more movement look when you add highlights, or a mix of lowlights and highlights.
Baby lights are very delicate highlights, Lowlights are when you introduce darker shades to restore contrast and depth and lastly, highlights are when you add lighter strands to the hair. More of our colourists prefer to go more chunky by using lowlights and focusing on the mid shaft and roots. Lowlights should never be on full length as it can cause the Zebra-stripe effect that is so dreadful. The chunkier, thicker highlights tend to appear more trendy and edgy, while thinner ones seem more natural with sophistication. Also, the more tightly the highlights are tacked together, your hair will appear less contrast and lighter.
4. Hair highlights will flatter your skin and hair
Sometimes, highlights on your hair appear to look a bit or “off.” If this is the case, then you’re probably adding additional bronzer, blush or more vibrant lipstick to make up for. Apart from all the benefits to your hair, highlights can also give an enhanced glow to your sun-damaged skin, ashy and dull skin, lightening the dark under-eye circles and soften the appearance of wrinkles. Sometimes, your skin tones and highlights aren’t always on the same page. A very basic rule of thumb is for warm skin tones to go for cool highlights as well as cool skin tones to go for warm highlights. Cooler highlights can be found in the shades range from ash, silver, mocha, champagne, sand, beige or toffee, while warmer lights tend to be more amber, golden caramel, butterscotch, russet, strawberry, cinnamon or honey. Discuss with your colourist which highlights shades will benefit your hair and skin.
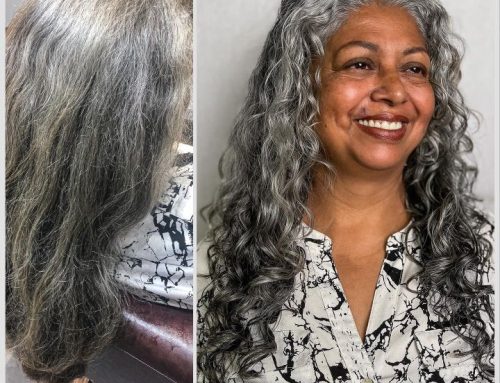
5. Utilize lowlights or highlights instead of transitioning to grey
If you’re looking to make your greys less obvious or embrace and accept them, deviate from processed colour to grey, or simply to be a more attractive shade of grey, “lights” are your friends. They will allow you to hold off and avoid all-over hue. If you are trying to transit out of doing your routine grey touch-ups, try to get hair highlights (often combined with a subtle base colour) to allow the easier way to turn grey more naturally and soften the harsher grow-out till you are prepared to cut. The addition of lowlights can provide the hair with a flattering and gentle effect on facial lines and features and also more depth on the hair. Naturally, people with lighter blondes and light brunette hair will have the simplest time. The result is the blonde-brown-grey mixture called bronde, or a blonde-grey blending that is referred to as gronde. If you have darker hair, you can ask your colourist to apply a combination of highlights and lowlights. It’s an easy alternative to going cold turkey and enduring the growing-in process.
6. Make sure you know when you have more than enough highlights
Sometimes, less is more. The standard rule is to have your highlights maintained within 4 shades of your base hair colour and any more than that can make you look rather harsh. At the lightest, brunettes can choose to go for auburns, caramel for blondes and copper gold, or greys should try for baby blonde. Doing a few highlights near the face which is also known as “money pieces” will help to brighten and illuminate your overall look without much maintenance. It is your control and choice with this. Highlights don’t need to be all-over or dramatic in order to enhance the colour of your base. Even brunettes with the darkest shades can remain as brunettes and just add striking sparks or subtle round the face to make the overall darker frame appear softer. People who prefer a more bold look can dial up the contrast and intensity.
7. Highlights for your hairstyle, and also the hair parting
Although changing the parting of your hair (from the left side to the right or off-center for instance) could add lift to the crown or hairline, it also affects the visibility and placement of the highlights. It is also possible to have one’s hair pulled upwards or backwards instead of down or air-dry your hair to create hair with texture and waves instead of blow-drying it smooth for a total transformation of your hairstyle , like changing from long to shorter bob haircut, a side-parting lob hairstyle to layered haircut, blunt cut or bangs hairstyles. You don’t want to spend on hair colour and end up only to get it cut off. The colourist needs to know and work on your actual hairstyle so that they have a good understanding of where the highlights ought to be placed. The majority of salons will perform the hair colouring first on dry hair and then cut it on wet hair. While this can be a great way to speed up their work, it will not be not serving your good interest in your hair highlights if you’re planning to change your hairstyle. Be vocal and express yourself in the way you want to.
8. You can head to the hair salon wearing “dirty” hair
Not kidding! Hair dyes or colour will hold better when they are in the second or even third-day hair rather than on clean hair because the natural oils create on the hair with a subtle protection layer from the chemicals that are being applied. However, please do not visit the salon with overly sweaty and oily hair. Also be sure to avoid packing on the products for styling on the days you’re hoping to have highlights. Colourists advise clients to wait between 48 and 72 hours after receiving highlights in order to allow the highlights to “settle down” prior to washing their hair. Make a plan in advance.
9. Get it done by a hair salon, if possible.
The latest online hair highlighting kits are a far cry from the drugstore-style boxes that have caps and pull-through hooks. However, even modernized and upgraded DIY streaks aren’t as simple as the at-home all-over colour … including online chats, videos and customer support that walks you through. Let’s face it and be realistic. Highlights are basically about bleaching your hair and when you’re dealing with hair that’s damaged, dry, thinning, colour treated or greying, the situation can become risky quickly. Only experienced, skilled, knowledgeable colourists at hair salons can evaluate and determine whether your hair’s hair is able to safely and effectively take on highlights over colour, or to get the placement and application of highlights just right and safe. We recommend that you at least schedule an in-person appointment with a colourist in a salon if you decide to go for a kit. For those daring individuals who are willing to experiment with kits, make sure they’re based on virgin hair or lighter blonde base colour.
10. Make sure you are ready to change additional products for care
Hair that is highlighted tends to be drier, fragile and porous as well as it is susceptible to frizz or breakage. So be certain to treat it with care. Alternate between moisturizing, protein-boosting treatment and colour-depositing shampoos that boost hydration, strengthen and eliminate brassiness or faded “highlights,” and supplement your routine conditioning with a hair mask for every week or leave-ins conditioning. Shampoo and wash your hair no more than 2 or 3 every week. You can cut down on the heat styling process by avoiding flat irons or curling irons as well as applying a heat protector prior to each blow-dry.
Leave A Comment